Navigation
Introduction
This tutorial explains how to use the ROS navigation capabilities to move the TurtleBot autonomously. It introduces the very basic concepts of the ROS Navigation Stack by focusing on the move_base package, with a suitable configuration for the costmap, the global_planner and the teb_local_planner.
Lines beginning with $ are terminal commands.
To open a new terminal use the shortcut Ctrl + Alt + T.
To open a new tab inside an existing terminal use the shortcut Ctrl + Shift + T.
To kill a process in a terminal use the shortcut Ctrl + C.
Lines beginning with # indicate the syntax of the commands.
Code is separated in boxes.
Code is case sensitive.
General Approach
The ROS navigation stack lets you move a robot to a desired location and
it consists of several ROS components. Two important ones are explained
in the following. The major element is called move_base, which
finally controls the robot platform. An overview of its interactions is
depicted in Figure 13.
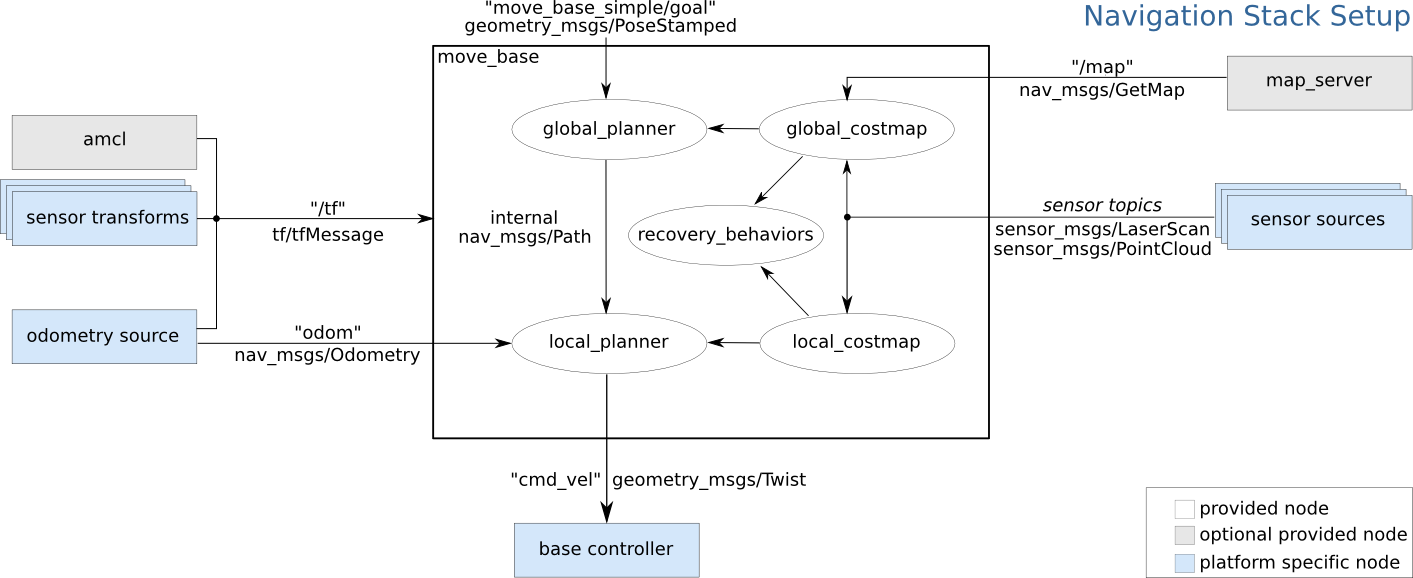
Figure 13 move_base Scheme
A more detailed description can be found at http://wiki.ros.org/move_base.
AMCL is the package that is in charge for localizing the robot
relative to the given map. As a result it will publish the
transformation between the odom frame, that is a fixed point of
reference with respect to the robot, and the map frame, which is globally fixed.
Setup move_base
The move_base package provides an implementation of an
action (for further information have a look the actionlib package at
http://wiki.ros.org/actionlib) that will attempt to reach an e.g. user-defined
goal in the real world with a mobile base. The move_base
node combines a global planner and a local planner, along with a
costmap, to accomplish its global navigation task. To fulfill the given
task, the move_base requires:
Map (
nav_msgs/GetMap): Anything that provides a map, e.g. gmapping, hector_slam or map_server.Odometry (
nav_msgs/Odometry): To calculate the next motion commands according to the difference of the robot to the current global way point. hector_slam works fine for that purpose too, although a real odometry would be desired.Localization (
tf/tfMessage): To be aware of the robot’s position. A package like AMCL provides a robust approach to localization. In particular, we need an instance providing a transform from the world’s fixed frame (e.g.map) and the odometry frame (e.g.odom). These frames have to be configured in the costmap parameters too.Sensory Information (
sensor_msgs/LaserScan): In order to fill the costmaps with information we want to make use of, sensory information is gathered by a laser scanner. The user can choose different sensor types to incorporate into a particular scenario. Theobstacle_layercan be modified via either PointCloud or LaserScan sources. Another layer can make use of range_sensors (e.g. ultrasound range sensors) – this is not used in this tutorial though.Mobile Base (
geometry_msgs/Twist): Interface of the Navigation-Stack to send motion commands. This is done by sending messages that provide linear and angular velocities.
Create a package in your workspace tb3_ws and name it tb3_navigation. It should have dependencies on rospy, move_base, global_planner, and teb_local_planner. Inside the package, create the standard launch folder. Add a launch file as follows and name it move_base.launch:
<?xml version="1.0"?>
<launch>
    <node pkg="move_base" type="move_base" respawn="false" name="move_base" output="screen">
        <param name="base_local_planner" value="teb_local_planner/TebLocalPlannerROS" if="$(eval local_planner == 'teb_local_planner')"/>

        <param name="base_global_planner" value="global_planner/GlobalPlanner"/>

        <rosparam file="$(find tb3_navigation)/cfg/costmap_common_params.yaml" command="load" ns="global_costmap" />

        <rosparam file="$(find tb3_navigation)/cfg/costmap_common_params.yaml" command="load" ns="local_costmap" />

        <rosparam file="$(find tb3_navigation)/cfg/global_costmap_params.yaml" command="load" />

        <rosparam file="$(find tb3_navigation)/cfg/local_costmap_params.yaml" command="load" />

        <rosparam file="$(find tb3_navigation)/cfg/global_planner_params.yaml" command="load" />

        <rosparam file="$(find tb3_navigation)/cfg/teb_local_planner_params.yaml" command="load" />

        <rosparam file="$(find tb3_navigation)/cfg/costmap_converter_params.yaml" command="load" />

        <rosparam file="$(find tb3_navigation)/cfg/move_base_params.yaml" command="load"/>

    </node>
</launch>
Configuration Files
The custom configurations for the move_base node, global
planner (“Planner”), local planner (“Controller”), and the local and global
costmaps can be loaded by the move_base.launch file as shown above.
costmap_common_params.yaml
These are the parameters that are intended to be the same for the global and local costmap. These parameters are loaded twice over into the respective namespaces via the launch file.
obstacle_layer/footprint: This is a set of points defining the footprint of the robot.obstacle_layer/observation_sources: This option is set depending on the sources one would like to incorporate in setting up the costmap. For example, we would like to incorporate the data gathered by a laser scanner. Beneath the laser scanner, we can make use of a PointCloud as we can’t detect chairs just with a 2D laser scanner. Make sure that you set up the correct frame for the laser and the correct topic name.inflation_layer/cost_scaling_factor: Exponential rate at which the obstacle cost drops off. You might want to try different values in order to get different distances kept by the global planner from obstacles.inflation_layer/inflation_radius: Maximum distance from an obstacle at which costs are incurred for planning paths.
local_costmap_params.yaml
These are additionally set parameters for the local costmap only.
local_costmap/global_frame: Fixed frame in order to track motion to therobot_base_frame. This will either be/mapor/odom, based on your mapping setup.local_costmap/robot_base_frame: Frame on the robot in order to track motion to theglobal_frame. This is usuallybase_footprint.local_costmap/widthand/height: The dimensions of the costmap. This value is crucial for performance as it determines the space to plan for the local planner. A small size of the local costmap e.g. reduces the computational load of the teb_local_planner but also prevents it from having a larger lookahead.pluginsrefer to the layers of the costmap that you wish to keep active and the sequence for the same.
global_costmap_params.yaml
These are additionally set parameters for the global costmap only.
global_costmap/footprint: For optimization/obstacle avoidance purposes, one may make use of a different footprint in global costmap compared to local costmap.global_costmap/global_frame: Fixed frame in order to track motion to therobot_base_frame. This will either be/mapor/odom, based on your mapping setup.global_costmap/robot_base_frame: Frame on the robot in order to track motion to theglobal_frame. This is usuallybase_footprint.pluginsrefer to the layers of the costmap that you wish to keep active and the sequence for the same.
Detailed information can be found at http://wiki.ros.org/costmap_2d.
move_base_params.yaml
These are the parameters for the move_base node.
controller_frequency: Number of new motion commands per second. The rate is specified in Hz at which to run the control loop and send velocity commands to the base. This value is critical when low computational resources are available. The teb_local_planner usually requires a lot of CPU power during runtime. If the computation speed can’t keep up the robot may hit things, because the base only executes the most recent motion commands which are supposed to be updated at a rate defined bycontroller_frequency.controller_patience: Number of seconds defining a timeout for the local planner to send motion commands. The move_base would usually execute recovery behaviours after this time, although we don’t make use of this for now. In our case it will simply fail to execute the motion.shutdown_costmaps: By default the costmaps are constantly computed even when the robot is not moving. As this causes a lot of unneeded computation we can pause calculation of costmaps when the robot is idle by setting this value to true.global_costmap/robot_base_frame: Frame on the robot in order to track motion to theglobal_frame. This is usuallybase_footprint.
Other such parameters are described in detail at http://wiki.ros.org/move_base.
global_planner_params.yaml
GlobalPlanner/default_tolerance: Allow planner to plan with tolerance, but get as close to goal as possible.GlobalPlanner/visualize_potential: Whether you wish for the planner to publish its calculated potential.GlobalPlanner/use_dijkstra: Switch between planning using Dijkstra or A* algorithms.GlobalPlanner/use_quadratic: Switch between using quadratic approximation of potential or a simpler calculation.GlobalPlanner/use_grid_path: Switch between grid path or gradient path for planning.GlobalPlanner/orientation_mode: How to interpolate orientation of poses along the path.GlobalPlanner/lethal_cost: Cost that the planner must consider lethal for path planning.GlobalPlanner/neutral_cost: The neutral cost value for cells.GlobalPlanner/cost_factor: Multiplicative factor for the costs.
Have a look at other parameters on http://wiki.ros.org/global_planner.
teb_local_planner_params.yaml
The local planner can further be fine tuned as per the needs with a number of parameters as well.
TebLocalPlannerROS/dt_ref: This value determines the metric difference between the states of the planned path. Increase this to get a better performance.TebLocalPlannerROS/max_global_plan_lookahead_dist: This value tells the local planner what point on the global path is to be taken as the reference point for the local planner.TebLocalPlannerROS/feasibility_check_no_poses: This value takes the given number of poses from the robots position and checks them for feasibility w.r.t the defined footprint.TebLocalPlannerROS/max_vel: These values determine the particular velocities. They are important to let the scan matcher/mapping process keep up.TebLocalPlannerROS/acc_lim: These values determine the particular acceleration limits. They are important to let the scan matcher/mapping process keep up.TebLocalPlannerROS/min_turning_radius: Minimum turning radius of a car-like robot. Make sure that this value exceeds the real turning radius by about 10% in order to make sure, that it will not plan too narrow curves.TebLocalPlannerROS/wheelbase: The metric difference between the axles. This value is considered positive when the steering axle is in front of the other axle.TebLocalPlannerROS/footprint_model: Next to the footprint defined in the costmap the teb_local_planner makes use of an own definition of a footprint. This is done to lower the computational effort required to perform planning. In our case a line fits, that describes the metric difference from rear to front axle. You might also try a setup with two_circles. It might allow the planner to obtain better paths.TebLocalPlannerROS/goal_tolerance: The goal tolerances set in meters and rad.TebLocalPlannerROS/min_obstacle_dist: The minimum distance to be kept from obstacles. This helps in order to get a smoother overall behaviour but it can also lead to complications in narrow environments.Hint
This value is quite important because the TurtleBot sometimes cannot achieve the desired steering angles/rotational velocity that the navigation stack wants to be executed. You may want to tweak this value to get a good performance in narrow environments.
TebLocalPlannerROS/weight: It is possible to tweak weights in order to tune the overall optimization behaviour of the teb_local_planner.
Many other available parameters and tips are detailed on http://wiki.ros.org/teb_local_planner and in the FAQ.
Task
Copy these seven files into a new folder named cfg in your package tb3_navigation.
Tweak Parameters at Runtime
In order to set parameters with the dynamic reconfigure functionality
simply start up the rqt_reconfigure tool on the desktop PC.
$ rosrun rqt_reconfigure rqt_reconfigure
This lets you dynamically change values at runtime. Try to find out the different features of the GUI on your own.