Camera Calibration
Introduction
This tutorial explains how to calibrate the camera. A good calibration is necessary for image processing. The output of calibration process is a calibration matrix. A calibration contains rectification coefficients for lens distortion as well as intrinsic and extrinsic coefficients, which are needed for reconstruction of 3D objects from 2D images.
Lines beginning with $ are terminal commands.
To open a new terminal use the shortcut Ctrl + Alt + T.
To open a new tab inside an existing terminal use the shortcut Ctrl + Shift + T.
To kill a process in a terminal use the shortcut Ctrl + C.
Lines beginning with # indicate the syntax of the commands.
Code is separated in boxes.
Code is case sensitive.
Using a USB Camera
Attention
If you don’t have an usb camera or webcam, you have to use the gazebo camera in the turtlebot3 simulation. Gazebo already publishes the camera_info topic with calibration data, but you should still learn the procedure.
Download the the calibration target gazebo model.
Calibration Target Gazebo ModelExtract it in
~/.gazebo/models.$ ros2 launch turtlebot3_gazebo turtlebot3_house.launch.pyPlace it in your world.
Skip this chapter.
To run the webcam, use the ROS2 package usb_camera_driver. It provides an interface to all standard USB cameras.
$ cd ~/robot_ws/src
$ git clone https://github.com/klintan/ros2_usb_camera
$ cd ~/robot_ws
$ colcon build
$ source ~/.bashrc
$ ros2 launch usb_camera_driver usb_camera_node.launch.py
Task
Start the camera with the new launch file and visualize the image stream in RViz.
$ rviz2Add > Image
As you maybe already noticed, you got a ROS warning during the starting process of the camera node: Using default calibration URL. This happens because you are not providing any calibration information to the camera node. For many image processing applications in ROS you have to calibrate the camera.
Calibrating a Camera
For calibration, the ROS package camera_calibration can be used.
$ cd ~/robot_ws/src``
$ git clone -b ros2 https://github.com/ros-perception/image_pipeline``
   # - Delete all folders in "image_pipeline" except "camera_calibration"
   #   or install all package dependencies
   # - On cv2 import error: ``sudo apt install python3-opencv``
$ cd ~/robot_ws``
$ colcon build``
$ source ~/.bashrc``
Calibration Process
Read the whole process once before starting calibration.
Print Checkerboard (not for simulation).
Start the camera with
$ ros2 launch usb_camera_driver usb_camera_node.launch.pyor the simulation with$ ros2 launch turtlebot3_gazebo turtlebot3_house.launch.pyand place the calibration target in front of the turtlebot3Check your camera info topic. All intrinsic camera matrices should be empty or zero (not in simulation).
Launch the calibration with correct parameters.
$ ros2 run camera_calibration cameracalibrator -c camera --size=8x6 --square=0.05 image:=/camera/image_rawIt will pop up a new window, like shown in Figure 10.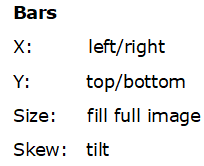

Figure 10 Calibration Tool
In order to get a good calibration result, you will need to move the checkerboard around in the camera view such that the checkerboard:
is on the camera’s left, right, top and bottom of field of view
is filling the whole field of view
is tilted to the left, right, top and bottom (skew)
At each step (s. Figure 11), hold the checkerboard still until the pattern is highlighted in the calibration window.

Figure 11 Calibration Steps
When all 4 bars (X, Y, Size and Skew) are in green click on calibrate button.
Note
It may take some time due to large amount of data to be processed.
After the calibration is done, click on the Save button.
Now click on Commit.
Copy the generated calibration data (
calibrationdata.tar.gz) from/tmpdirectory into theconfigfolder of usb_camera_driverExtract the
calibrationdata.tar.gzfile:$ cd ~/robot_ws/src/ros2_usb_camera/config $ mkdir calib $ tar –xvzf calibrationdata.tar.gz -C calibRename the
ost.txtfile tocalibration.ini.Convert the
calibration.inifile to a yml format.$ cd calib $ ros2 run camera_calibration_parsers convert calibration.ini webcam.ymlMove the
webcam.ymlfile to theconfigfolder in your usb_camera_driver package.Open the
usb_camera_node.launch.pyfile and edit thecamera_info_urlparameter with the new calibration file.usb_camera = launch_ros.actions.Node( package='usb_camera_driver', node_executable='usb_camera_driver_node', output='screen', node_namespace=ns, parameters=[{"camera_calibration_file": "file:///config/webcam.yml"}])
Launch
usb_camera_node.launch.py, take a look at thecamera_infotopic and check, if the correct calibration data is published.
For more information visit http://wiki.ros.org/camera_calibration and http://wiki.ros.org/camera_calibration/Tutorials/MonocularCalibration.